
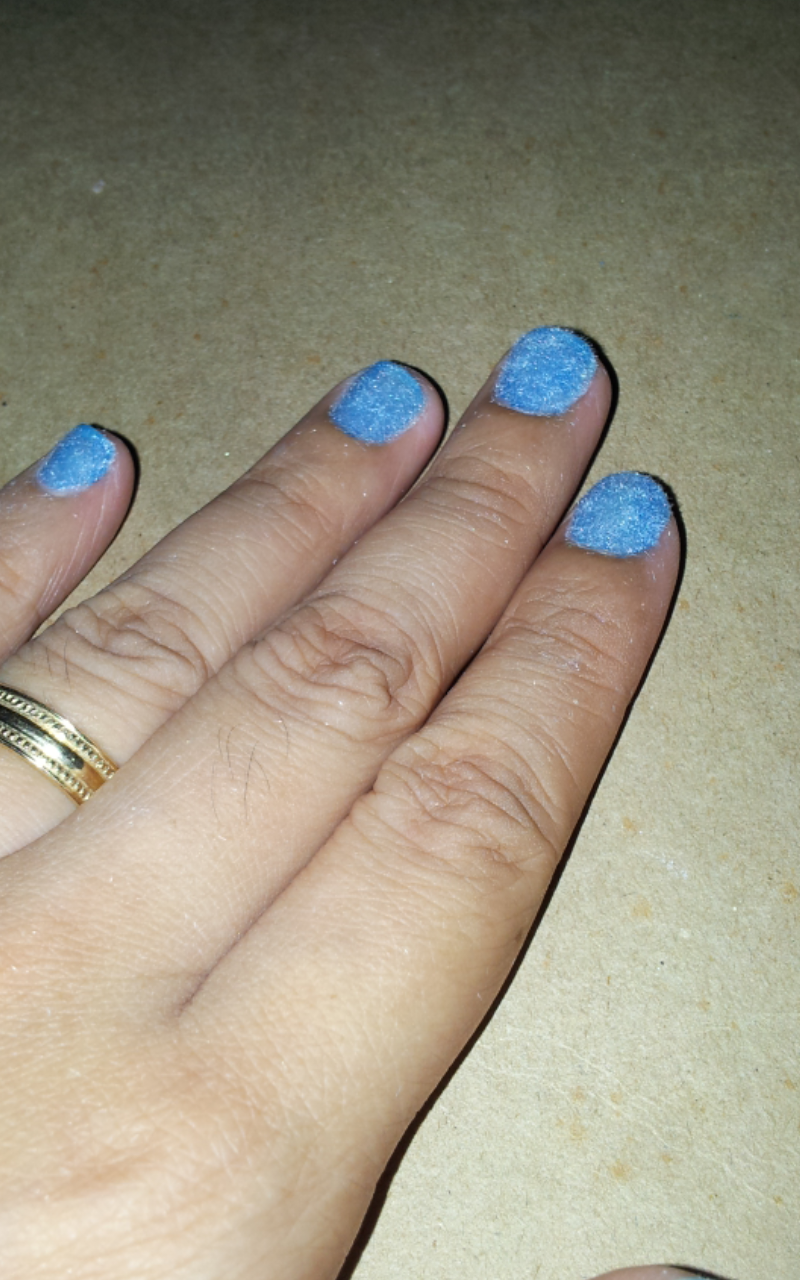
Here goes my 1, 2, 3, done instruction:
You will need:
Polish (any color that matches your flocking powder)
Flocking powder (for a carpet-like touch)
How to do it:
1. Put the blue (the color of the polish I used) on the nail.
2. While still wet, sprinkle your flocking powder. In this case, I still use the blue flocking powder.
3. Let it dry. DO NOT PUT TOP COAT. It will ruin the design.
4. Done!
For people in General Santos City, I am selling FLOCKING POWDER. Just let me know for a very very affordable price.

For a closer look. Thanks for the visit my friend spider.


-----
For my cousin's nails...

Design: Assorted / Sample
Model: Hanna Faye Deonoso
Designer: Jonee
Designer: Jonee
(Melted Paint Design)
You will need:
Matte finish polish
Top coat
Polish of any colors
White Polish
How to do it:
1. Apply white color on nails and top it with matte finish polish for a dry look.
2. Apply any color of polish like on this case blue/yellow. It will serve as your melted paint.
3. When dry, apply top coat on the colors yellow and blue alone to make a shiny finish on these colors.
4. Done!
(Bloody Red)
You will need:
Black Polish
Red Polish
Top coat
How to do it:
1. Apply black polish on nails.
2. When it's already dry, apply red polish. Just do it like how you put your melted paint design.
3. Put top coat.
4. Done!
(Scarab)
You will need:
White Polish
Black Polish
Matte Finish Polish
Top Coat
Dotting tool
How to do it:
1. Apply white polish on nails and top it with matte finish for a dry look.
2. Using your dotting tool, draw a small circle at the top and big circle below the small circle. The small circle will serve as the head of the scarab and the big circle will represent the body.
3. Draw 3 legs on the left and 3 legs on the right. Apply top coat only on the drawn scarab. Applying the top coat only on the scarab will give emphasis on the scarab alone.
4. Done!
(Yin Yang)
You will need:
Black Polish
White Polish
Top Coat
How to do it:
1. Draw a curve using either your black or white polish. The curve should be the yin yang curve.
2. Apply black on the other side and white polish on the other side.
3. Place white dot on the black side and black dot on the white side. Finish it with top coat all over.
4. Done!
Don't forget to visit my other SIMPLE and EASY nail art tutorials:
http://joneeacedilla.blogspot.com/2013_02_01_archive.html
http://joneeacedilla.blogspot.com/2013/02/leisure-1-nail-care.html
http://joneeacedilla.blogspot.com/2013/03/leisure-4-kiddie-nail-art.html
http://joneeacedilla.blogspot.com/2013/03/leisure-8-strawberry-nail-art.html
Have a great day!!
P. S. Thanks to my cousin for letting me experiment something on her nails.
Love,
Jonee Slimwitch
looks interesting and quite easy to do
ReplyDeletehttp://loving-evelyn.blogpost.ro
Yes evelyn... This is very easy.. And I know you can even do better designs than mine.. Thanks for dropping by!!! :)
Delete